![]()
API Testing Using MCP Server (End User Guide)
A ready-to-use Model Context Protocol (MCP) server for HTTP API testing, powered by Playwright. This guide helps you install, configure, and run the MCP server locally as an npm package.
📋 Table of Contents
- Overview
- Prerequisites
- Setup
- Configurations
- Usage
- Example scenarios and prompts for MCP server usage
- Upcoming enhancements
- Troubleshooting
- Support
🌟 Overview
The Playwright API MCP Server enables API testing via the Model Context Protocol. It supports GET, POST, PUT, and DELETE requests.
📋 Prerequisites
- Node.js: v18.0.0 or higher.
- npm: Comes with Node.js.
- VS Code: MCP-compatible client.
- Github Copilot: Make sure the GitHub Copilot extension is installed and enabled in VS Code.
Watch the video to understand how to enable Github Copilot: https://www.youtube.com/watch?v=etP5wq4Zl20 - How to use Github Copilot for free Watch the Video: https://www.youtube.com/watch?v=X_Aet9ndh_Y
🚀 Setup
-
Create a Node.js Project in VS Code:
- Create a new folder with a meaningful name (e.g.
my-project). - Open the folder in Visual Studio Code.
- Launch the integrated terminal (via
View > Terminal). - Choose your preferred shell (e.g.
Git Bash, Command Prompt, or PowerShell). - Run the following command to initialise the project:
npm init -y - This will generate a package.json file with default settings
- Create a new folder with a meaningful name (e.g.
-
Install the MCP Server Package
- Now, run the below command to install the mcp server package.
npm i @automate-io/api-testing-mcp@latest
- Now, run the below command to install the mcp server package.
⚙️ Configurations
-
Open your project folder in VS Code
-
If the
mcp.jsonfile does not already exist, create it inside theroot/.vscode/directory. If the file is already present, you can skip this step -
Add the
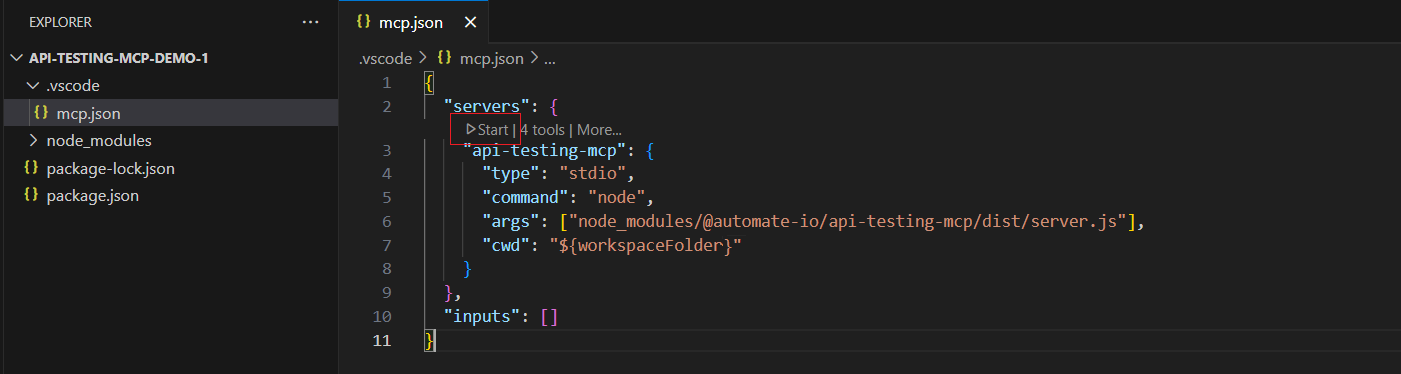
api-testing-mcpconfiguration under theserverskey in themcp.jsonfile, as shown below
{
  "servers": {
    "api-testing-mcp": {
      "type": "stdio",
      "command": "node",
      "args": ["node_modules/@automate-io/api-testing-mcp/dist/server.js"],
      "cwd": "${workspaceFolder}"
    }
  },
  "inputs": []
}
- ❗Important Note:If you are working in a
monorepo, ensure theargsfield in yourmcp.jsonfile is correctly configured. Refer to the Monorepo MCP Configuration guide for detailed instructions.
If your test code resides in astandalonerepository, no changes are needed, you are good to go.
📖 Getting started with MCP testing
- Start the MCP Server
-
Click the highlighted start button in the mcp.json file as shown below to start the MCP server.
- Input the prompt
- Open GitHub Copilot chat window in VS Code with Agent mode selected.
- Enter a prompt that outlines the API you wish to test.
✅ Example scenarios and prompts for MCP server usage
- Scenario 1 : To test all endpoints in one go.
- Scenario 2 : To test a single endpoint.
⏭️ Upcoming enhancements
- Implement schema validations for response payloads
- Add reusable resources to support API testing workflows
- Introduce predefined prompts to streamline common scenarios
- Provide a sample HTML test report template to guide LLm about the layout and formatting
- Refactor existing logic and implement robust error handling to improve reliability and maintainability
🔧 Troubleshooting
-
Server not running?
Double-check your MCP client configuration. -
Module not found?
Reinstall the package:npm i @automate-io/api-testing-mcp@latest
🆘 Support
- Review this guide and your MCP client documentation.
- For issues, open GitHub Issues here.
- Consult Model Context Protocol Documentation.