Agent Message Bus (AMB)
AMB is a shared message bus for AI agents working in Cursor, Codex, Claude Code, or custom workers. It gives them one shared workflow layer: threads, inbox, ACK, retry, and DLQ.
Use AMB when you want one agent to delegate work to other agents and keep the whole workflow visible in one Dashboard instead of splitting it across separate IDE chats.
Use AMB in Your Project in 5 Minutes
This is the fastest way to try AMB in your own repository:
- Start the published AMB stack from Docker Hub
- Install the published MCP package in your project
- Connect your AI client to AMB
- Register your agents
- Ask the
orchestratorto run a workflow - Watch the workflow in the Dashboard
Prerequisites
Before you start, make sure you have:
- Docker or Podman with Compose support
- Node.js 20+ in your own project
pnpmif your project usespnpm, ornpmif your project usesnpm- an AI client that supports MCP, such as Cursor, Codex, or Claude Code
- a project that contains either
.cursor/agents/registry.jsonor agent markdown files in.cursor/agents/*.mdor.agents/*.md
For the first run, you do not need to clone the AMB repository. The quick start below uses the published AMB stack and the published @openaisdk/amb-mcp package.
Quick Start
Download and start the published AMB stack:
curl -O https://raw.githubusercontent.com/bizmedia/amb/main/deploy/compose/amb-compose.yml
WEB_PORT=4333 API_PORT=4334 POSTGRES_PORT=5433 docker compose -f amb-compose.yml up -d
This is the safe default when you already run local AMB development on 3333/3334 on the same machine.
If those ports are also in use, override them when starting the stack:
WEB_PORT=5333 API_PORT=5334 POSTGRES_PORT=5543 docker compose -f amb-compose.yml up -d
curl http://localhost:5334/api/health
Wait until the API becomes healthy:
curl http://localhost:4334/api/health
Open:
- Dashboard:
http://localhost:4333 - API health:
http://localhost:4334/api/health
Sign in with:
- email:
admin@local.test - password:
ChangeMe123!
The published stack bootstraps the default user and the Default Project automatically.
Then:
- Open
Default Projectin the Dashboard - Copy its
Project ID
Install the MCP package in your own project:
pnpm add -D @openaisdk/amb-mcp
You can use npm install -D @openaisdk/amb-mcp if your project uses npm.
All examples below use pnpm. If your project uses npm, replace:
pnpm exec amb-mcpwithnpx amb-mcp"command": "pnpm", "args": ["exec", "amb-mcp"]with"command": "npx", "args": ["amb-mcp"]
Public Releases
Published Docker images and the @openaisdk/amb-mcp package are released from GitHub Actions after changes land in main.
If you consume AMB as a published stack, use the Docker Hub images referenced by deploy/compose/amb-compose.yml and the published npm package. Local developer machines are no longer the primary release path.
What AMB Adds to Your Project
If you are new to multi-agent systems, think of an agent as a role with a clear responsibility and its own prompt.
Examples:
podefines scope and acceptance criteriaarchitectproposes technical designdevimplements changesqavalidates behavior and edge casesorchestratorcoordinates the workflow and keeps it in one thread
AMB does not replace your AI client. Your AI client runs the prompts. AMB stores agent identities and routes messages between them through:
- threads for one task or workflow
- inbox for incoming work
- ACK for delivery confirmation
- retry and DLQ for failed delivery
Connect MCP
All clients should point to the same local AMB instance and the same Project ID.
Shared values:
MESSAGE_BUS_URL=http://localhost:4333MESSAGE_BUS_PROJECT_ID=<YOUR_PROJECT_ID>
If you override WEB_PORT, MESSAGE_BUS_URL must use the same port. Example:
WEB_PORT=5333=>MESSAGE_BUS_URL=http://localhost:5333
Cursor
Create .cursor/mcp.json in your project:
{
  "mcpServers": {
    "message-bus": {
      "command": "pnpm",
      "args": ["exec", "amb-mcp"],
      "env": {
        "MESSAGE_BUS_URL": "http://localhost:4333",
        "MESSAGE_BUS_PROJECT_ID": "22222222-2222-4222-8222-222222222222"
      }
    }
  }
}
If your project uses npm, use:
{
  "mcpServers": {
    "message-bus": {
      "command": "npx",
      "args": ["amb-mcp"],
      "env": {
        "MESSAGE_BUS_URL": "http://localhost:4333",
        "MESSAGE_BUS_PROJECT_ID": "22222222-2222-4222-8222-222222222222"
      }
    }
  }
}
Codex
Create .codex/config.toml in your project:
[mcp_servers.message-bus]
command = "pnpm"
args = ["exec", "amb-mcp"]

[mcp_servers.message-bus.env]
MESSAGE_BUS_URL = "http://localhost:4333"
MESSAGE_BUS_PROJECT_ID = "22222222-2222-4222-8222-222222222222"
If your project uses npm, use:
[mcp_servers.message-bus]
command = "npx"
args = ["amb-mcp"]

[mcp_servers.message-bus.env]
MESSAGE_BUS_URL = "http://localhost:4333"
MESSAGE_BUS_PROJECT_ID = "22222222-2222-4222-8222-222222222222"
Claude Code
Add the same server to your Claude MCP config:
{
  "mcpServers": {
    "message-bus": {
      "command": "pnpm",
      "args": ["exec", "amb-mcp"],
      "env": {
        "MESSAGE_BUS_URL": "http://localhost:4333",
        "MESSAGE_BUS_PROJECT_ID": "22222222-2222-4222-8222-222222222222"
      }
    }
  }
}
If your project uses npm, use:
{
  "mcpServers": {
    "message-bus": {
      "command": "npx",
      "args": ["amb-mcp"],
      "env": {
        "MESSAGE_BUS_URL": "http://localhost:4333",
        "MESSAGE_BUS_PROJECT_ID": "22222222-2222-4222-8222-222222222222"
      }
    }
  }
}
Replace MESSAGE_BUS_PROJECT_ID with the Project ID from your Dashboard, then restart your client.
Efficient MCP Usage
The MCP package is optimized for low token usage:
- heavy list/read tools return summary objects by default
limitdefaults to20- full payloads are opt-in with
summary=false
Recommended usage pattern:
- Use small list calls first
- Inspect one thread, task, or inbox in detail only when needed
- Ask for full payloads only for targeted debugging
Examples:
{
  "agentId": "550e8400-e29b-41d4-a716-446655440000",
  "limit": 10
}
{
  "threadId": "550e8400-e29b-41d4-a716-446655440000",
  "limit": 50,
  "summary": false
}
Register Your Agents
AMB needs a registry of the agents that exist in your project.
If your project already has a registry like .cursor/agents/registry.json, you can register those agents directly into AMB.
Example registry structure:
{
  "agents": [
    {
      "id": "orchestrator",
      "name": "Workflow Orchestrator",
      "role": "orchestrator",
      "systemPromptFile": ".cursor/agents/orchestrator.md"
    },
    {
      "id": "dev",
      "name": "Developer",
      "role": "dev",
      "systemPromptFile": ".cursor/agents/dev.md"
    }
  ]
}
Recommended minimum set:
orchestratorpoarchitectdevqa
Recommended first run:
# or: npx amb-mcp setup
MESSAGE_BUS_URL=http://localhost:4333 \
MESSAGE_BUS_PROJECT_ID=<YOUR_PROJECT_ID> \
pnpm exec amb-mcp setup
setup is the 3-minute path. It looks for .cursor/agents/registry.json, falls back to markdown agent files in .cursor/agents or .agents, registers agents, and creates default threads.
You do not need registry.json for the first run. If your project only has agent markdown files, setup can infer agents automatically.
Example:
.cursor/agents/orchestrator.md
.cursor/agents/po.md
.cursor/agents/architect.md
.cursor/agents/dev.md
.cursor/agents/qa.md
In that case, setup will:
- create
registry.jsonautomatically - register those agents in AMB
- create their default threads
- tell you to open the Dashboard and verify the result
Manual commands if you want more control:
Register agents from your project:
# or: npx amb-mcp seed agents .cursor/agents
MESSAGE_BUS_URL=http://localhost:4333 \
MESSAGE_BUS_PROJECT_ID=<YOUR_PROJECT_ID> \
pnpm exec amb-mcp seed agents .cursor/agents
Register agents and default threads:
# or: npx amb-mcp seed all .cursor/agents
MESSAGE_BUS_URL=http://localhost:4333 \
MESSAGE_BUS_PROJECT_ID=<YOUR_PROJECT_ID> \
pnpm exec amb-mcp seed all .cursor/agents
After that, open the Dashboard and confirm that the agents appear in the selected project.
First Workflow
Send this prompt to your orchestrator:
Create a thread in AMB called "project-onboarding". Coordinate work across po, architect, dev, and qa to review this repository, identify the first useful improvement, and summarize the result in the same thread.
What You Should See
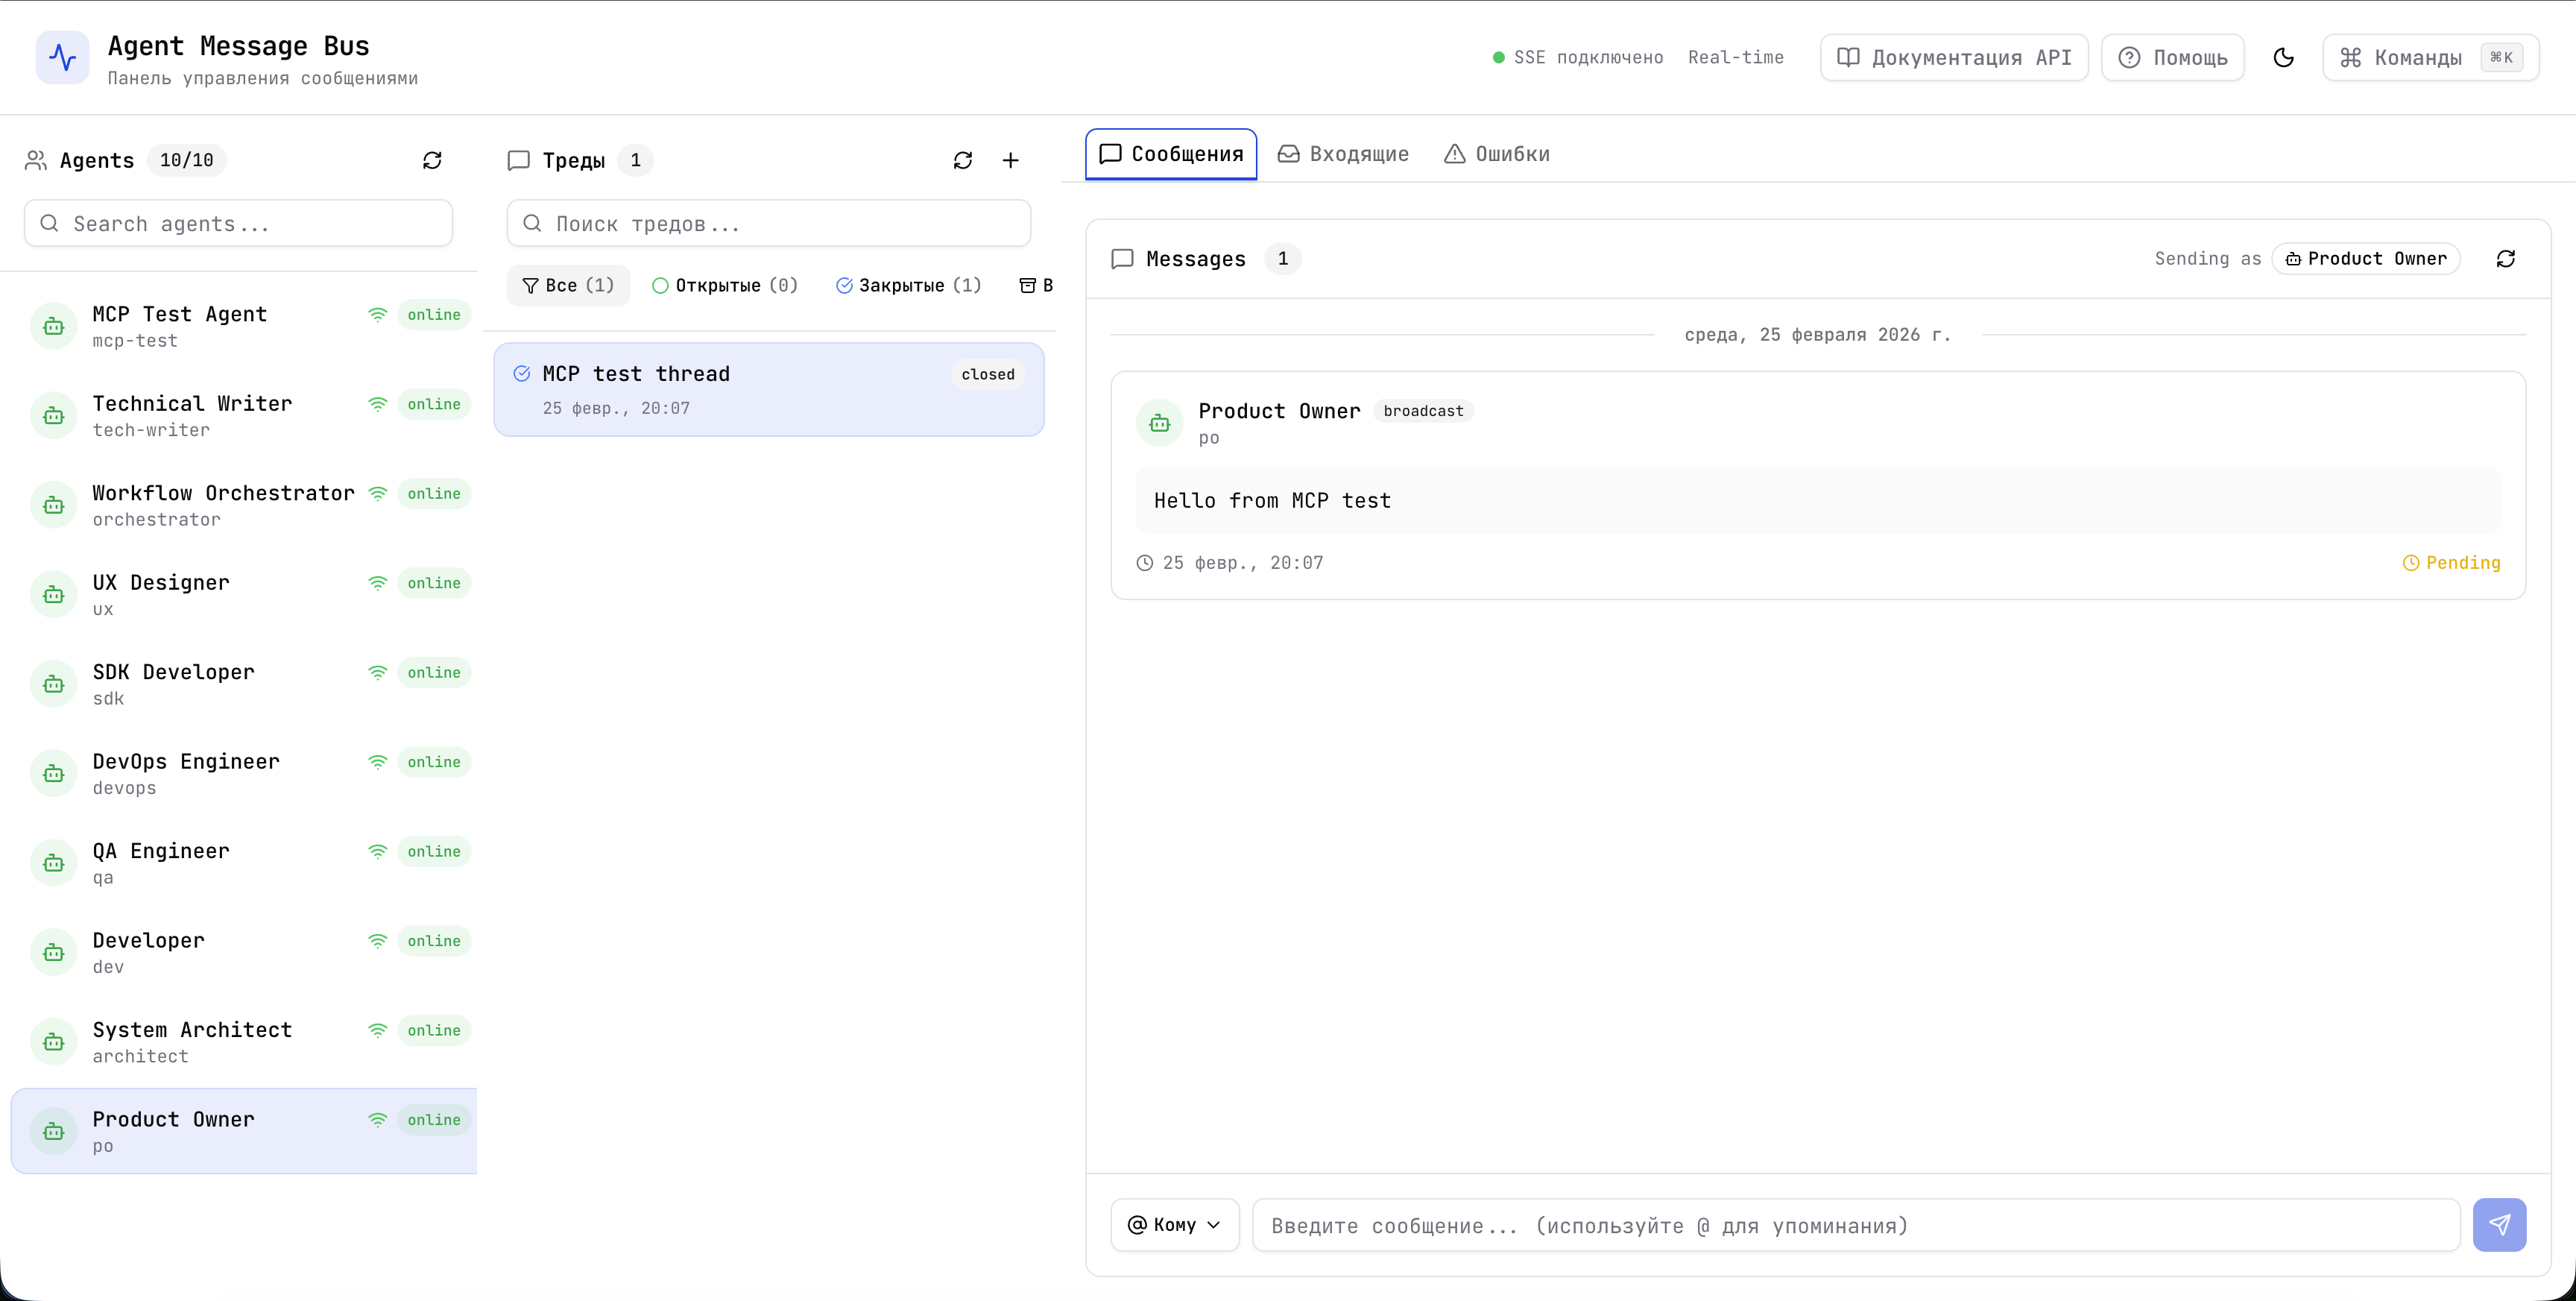
In the Dashboard you should see:
- a new thread created by the
orchestrator - messages sent to other roles
- replies from
po,architect,dev, andqa - a final summary posted by the
orchestrator
This is the main value of AMB: one shared workflow across multiple agents instead of isolated chats.
Cross-Client Setup
AMB becomes much more useful when different roles live in different tools but share one bus.
Example setup:
- Cursor:
dev - Codex:
architect - Claude Code:
po,qa - any client:
orchestrator
To make this work:
- Connect all clients to the same
MESSAGE_BUS_URL - Use the same
MESSAGE_BUS_PROJECT_IDeverywhere - Register the same agent set into that project
- Ask the
orchestratorto coordinate across those roles
Example cross-client prompt:
Create a thread in AMB called "cross-client-demo". Coordinate work across po, architect, dev, and qa for the task "Design and ship CSV export for threads". Ask po for acceptance criteria, architect for technical design, dev for implementation, and qa for validation. Keep the whole workflow in one AMB thread and finish with a final summary from the orchestrator.
Troubleshooting
docker compose up fails because a port is already in use
Start the published stack on different host ports:
WEB_PORT=5333 API_PORT=5334 POSTGRES_PORT=5543 docker compose -f amb-compose.yml up -d
Then update your MCP config to use the same web port:
MESSAGE_BUS_URL=http://localhost:5333
MCP is connected but tools do not appear
Check that:
@openaisdk/amb-mcpis installed in your project- your MCP config uses
pnpm exec amb-mcpornpx amb-mcp - you restarted Cursor, Codex, or Claude Code after editing the config
MESSAGE_BUS_PROJECT_IDpoints to the project you created in the Dashboard
seed agents succeeded but agents do not appear in the Dashboard
Usually this means:
- you seeded another project
- your registry path is wrong
- the Dashboard is open on another project
Run the command again and verify the selected project in the UI:
# or: npx amb-mcp seed agents .cursor/agents
MESSAGE_BUS_URL=http://localhost:4333 \
MESSAGE_BUS_PROJECT_ID=<YOUR_PROJECT_ID> \
pnpm exec amb-mcp seed agents .cursor/agents
The orchestrator creates a thread but other agents do not reply
Check that:
- the target roles exist in your registry
- the agents were registered into AMB
- all clients use the same
MESSAGE_BUS_PROJECT_ID - the roles in your prompt match the roles you actually registered
For the first run, keep all roles in one client. Move to Cursor + Codex + Claude Code only after the single-client flow works.
For AMB Development
If you want to develop AMB itself instead of only using it in your own project, use the source repository workflow and local package builds. That path is separate from the quick start above and is intended for contributors to AMB.
Useful entry points:
- QUICKSTART.md for the short onboarding path
- docs/SCRIPTS.md for repository scripts and dev workflows
From a cloned repository you can also start the same published stack with:
pnpm run deploy:amb
That command uses the published compose file from this repository and defaults to 4333/4334 to avoid colliding with the direct quick start above.