Selenium MCP Server

![]()
![]()
One-Click Install

The first MCP server with true parallel browser automation using Selenium Grid.
While other browser MCP servers run a single browser instance, Selenium MCP Server connects to Selenium Grid for massive parallel exploration — spin up 10, 20, or 100 browser sessions and explore your entire application simultaneously.
Why This Over Playwright MCP?
| Feature | Playwright MCP | Selenium MCP Server |
|---|---|---|
| Parallelism | Single browser, shared context | True parallel: Grid with unlimited nodes |
| Scaling | Limited by single browser | Horizontally scalable — add nodes as needed |
| Isolation | Shared state between clients | Full isolation per session |
| Multi-browser | One at a time | Chrome + Firefox + Edge simultaneously |
| Infrastructure | Simple | Docker Compose ready |
| AI Agent workflows | Basic | Planner → Generator → Healer pipeline |
Perfect for: AI agents that need to explore large applications fast, cross-browser testing, and enterprise automation at scale.
Quick Start
1. Install
# Install globally
npm install -g selenium-ai-agent

# Or run directly with npx (no install needed)
npx selenium-ai-agent
2. Configure Your MCP Client
Claude Code:
claude mcp add selenium-mcp -- npx selenium-ai-agent
Claude Desktop (~/Library/Application Support/Claude/claude_desktop_config.json):
{
  "mcpServers": {
    "selenium-mcp": {
      "command": "npx",
      "args": ["selenium-ai-agent"]
    }
  }
}
Cursor (.cursor/mcp.json):
{
  "mcpServers": {
    "selenium-mcp": {
      "command": "npx",
      "args": ["selenium-ai-agent"]
    }
  }
}
GitHub Copilot (.vscode/mcp.json):
{
  "servers": {
    "selenium-mcp": {
      "command": "npx",
      "args": ["selenium-ai-agent"],
      "type": "stdio"
    }
  }
}
See MCP Client Setup for all 6 clients (Claude Code, Claude Desktop, Cursor, Copilot, Cline, Windsurf).
3. Try It!
"Navigate to https://example.com and take a screenshot"
Example Chats
Copy-paste these prompts into your AI assistant after configuring the MCP server.
Navigate & Screenshot
You say:
Go to https://practiceautomatedtesting.com and take a screenshot
What happens:
navigate_to— opens the URL in a local Chrome browsertake_screenshot— captures the full page
AI responds:
I navigated to practiceautomatedtesting.com and took a screenshot. The page shows an e-commerce storefront with a navigation bar, featured products section, and a footer.
Explore & Create Test Plan
You say:
Explore the checkout flow at https://practiceautomatedtesting.com and create a test plan
What happens:
planner_setup_page— navigates to the site, captures the initial page snapshotplanner_explore_page— explores the homepage, discovers links to productsplanner_explore_page— follows the product → add-to-cart → cart page flowplanner_explore_page— continues through checkout, captures form fields and validationplanner_save_plan— writes the test plan to a markdown file
AI responds:
I explored the checkout flow across 4 pages and saved a test plan to
test-plans/checkout-flow.md. The plan covers 6 test scenarios including add to cart, checkout form validation, and successful order. Please review the plan before I generate test code.
Generate WebdriverIO Tests
You say:
Generate WebdriverIO tests for the login flow at https://practiceautomatedtesting.com
What happens:
- Initializes the project if needed —
npm init, installs@wdio/cli, createswdio.conf.ts generator_setup_page— opens the site withframework: "webdriverio-ts", starts recordingnavigate_to→input_text→click_element→verify_text_visible— interacts with the login formstop_recording— ends the recording sessiongenerator_write_test— generates a.test.tsfile from the recorded steps
AI responds:
I set up a WebdriverIO project, recorded the login flow, and generated
tests/login.test.ts:describe('Login Flow', () => { it('should log in with valid credentials', async () => { await browser.url('https://practiceautomatedtesting.com/login'); await $('[data-testid="email"]').setValue('user@example.com'); await $('[data-testid="password"]').setValue('password123'); await $('[data-testid="login-button"]').click(); await expect($('[data-testid="welcome-message"]')).toBeDisplayed(); }); });Run with:
npx wdio run wdio.conf.ts
Generate Playwright Tests
You say:
Create Playwright tests for the product search feature at https://practiceautomatedtesting.com
What happens:
- Initializes the project if needed —
npm init, installs@playwright/test, runsnpx playwright install generator_setup_page— opens the site withframework: "playwright-js", starts recording- Navigates and interacts with the search feature
stop_recording→generator_write_test— generates a Playwright test file
AI responds:
I set up a Playwright project, recorded the search flow, and generated
tests/product-search.spec.js:const { test, expect } = require('@playwright/test'); test('should search for products and display results', async ({ page }) => { await page.goto('https://practiceautomatedtesting.com/products'); await page.locator('[data-testid="search-input"]').fill('laptop'); await page.locator('[data-testid="search-button"]').click(); await expect(page.locator('[data-testid="results-count"]')).toBeVisible(); });Run with:
npx playwright test
Generate Selenium Python (pytest) Tests
You say:
Generate pytest Selenium tests for the registration form at https://practiceautomatedtesting.com
What happens:
- Sets up the project if needed — creates
venv, installsseleniumandpytestvia pip generator_setup_page— opens the site withframework: "selenium-python-pytest", starts recording- Navigates and fills in the registration form
stop_recording→generator_write_test— generates a pytest file
AI responds:
I set up a Python virtual environment with selenium and pytest, recorded the registration flow, and generated
tests/test_registration.py:class TestRegistration: def test_register_new_user(self, driver): driver.get("https://practiceautomatedtesting.com/register") driver.find_element(By.CSS_SELECTOR, '[data-testid="name"]').send_keys("Jane Doe") driver.find_element(By.CSS_SELECTOR, '[data-testid="email"]').send_keys("jane@example.com") driver.find_element(By.CSS_SELECTOR, '[data-testid="password"]').send_keys("SecurePass123!") driver.find_element(By.CSS_SELECTOR, '[data-testid="register-button"]').click() assert "Welcome" in WebDriverWait(driver, 10).until( EC.visibility_of_element_located((By.CSS_SELECTOR, '[data-testid="success-message"]')) ).textRun with:
pytest tests/test_registration.py -v
Generate Robot Framework Tests
You say:
Generate Robot Framework tests for the contact form at https://practiceautomatedtesting.com
What happens:
- Sets up the project if needed — creates
venv, installsrobotframeworkandrobotframework-seleniumlibraryvia pip generator_setup_page— opens the site withframework: "robot-framework", starts recording- Navigates to the contact page and fills in the form
stop_recording→generator_write_test— generates a.robotfile
AI responds:
I set up a Robot Framework environment, recorded the contact form flow, and generated
tests/contact_form.robot:*** Settings *** Library SeleniumLibrary *** Variables *** ${URL} https://practiceautomatedtesting.com/contact *** Test Cases *** Submit Contact Form With Valid Data Open Browser ${URL} chrome Input Text css=[data-testid="name"] Jane Doe Input Text css=[data-testid="email"] jane@example.com Input Text css=[data-testid="message"] Hello, I have a question about your products. Click Element css=[data-testid="submit-button"] Wait Until Element Is Visible css=[data-testid="success-message"] Element Should Contain css=[data-testid="success-message"] Thank you [Teardown] Close BrowserRun with:
robot tests/contact_form.robot
Run Tests & Heal Failures
You say:
Run my tests and fix any failures
What happens:
healer_run_tests— executes the test suite; 1 of 3 tests failshealer_debug_test— analyzes the failure (stale selector#old-login-btnnot found)healer_inspect_page— opens the page to find the correct selectorhealer_fix_test— updates the selector to[data-testid="login-button"]healer_run_tests— re-runs the suite; all 3 tests pass
AI responds:
I ran your test suite and found 1 failure: selector
#old-login-btnnot found. I inspected the page, updated it to[data-testid="login-button"], and re-ran — 3 passed, 0 failed.
Parallel Grid Exploration
Requires Grid setup.
You say:
Explore the entire site at https://practiceautomatedtesting.com in parallel using 4 browsers
What happens:
parallel_explore— spins up 4 Grid sessions exploring Homepage, Products, Cart, and Account simultaneouslyexploration_merge— combines all 4 results into a single site mapplanner_generate_plan— produces a comprehensive test plan from the merged data
AI responds:
I explored the site in parallel using 4 browsers on your Selenium Grid:
Session Section Pages Elements 1 Homepage 3 42 2 Products 8 156 3 Cart & Checkout 4 67 4 Account & Auth 3 38 18 unique pages, 303 elements discovered in ~12 seconds. Test plan saved to
test-plans/full-site-plan.md.
The Generator supports 14 frameworks:
webdriverio-ts,playwright-js,selenium-python-pytest,robot-framework,selenium-java-maven, and more. Examples 1–6 work with a local browser. Only parallel exploration requires Selenium Grid.
Parallel Exploration with Selenium Grid
Explore your entire application in seconds, not minutes:
Start the Grid
git clone https://github.com/learn-automated-testing/selenium_agent.git
cd selenium_agent/selenium-grid
docker-compose up -d

# Verify Grid is running
open http://localhost:4444  # Grid console
Configure with Grid
{
  "mcpServers": {
    "selenium-mcp": {
      "command": "npx",
      "args": ["selenium-ai-agent"],
      "env": {
        "SELENIUM_GRID_URL": "http://localhost:4444"
      }
    }
  }
}
Explore in Parallel
"Explore the e-commerce site at https://practiceautomatedtesting.com in parallel —
check the homepage, products, cart, and checkout sections simultaneously"
The agent will spin up 4 browser sessions on your Grid and explore all sections at once.
// What happens behind the scenes:
parallel_explore({
  baseUrl: "https://myshop.com",
  targets: [
    { url: "/", label: "Homepage", maxPages: 10 },
    { url: "/products", label: "Catalog", maxPages: 20 },
    { url: "/cart", label: "Cart Flow", maxPages: 5 },
    { url: "/account", label: "User Account", maxPages: 10 }
  ]
})
// → 4 browsers explore simultaneously
// → Results merged and deduplicated
// → Complete site map in one call
Scale up anytime:
docker-compose up -d --scale chrome-node=10
73 Tools
Grid & Parallel Execution
| Tool | Description |
|---|---|
grid_status | Check Grid health, nodes, and capacity |
grid_start | Start Docker Compose Grid |
grid_stop | Stop Docker Compose Grid |
grid_scale | Scale Grid nodes up/down |
session_create | Create browser session on Grid |
session_select | Switch active session |
session_list | List all Grid sessions |
session_destroy | Clean up a session |
session_destroy_all | Clean up all sessions |
parallel_explore | Explore multiple URLs simultaneously |
parallel_execute | Run tasks in parallel across sessions |
exploration_merge | Combine exploration results |
exploration_diff | Compare explorations |
planner_generate_plan | Generate test plan from exploration |
Navigation
navigate_to · go_back · go_forward · refresh_page
Page Analysis
capture_page · take_screenshot
Element Interactions
click_element · hover_element · select_option · drag_drop
Input
input_text · key_press · file_upload
Mouse
mouse_move · mouse_click · mouse_drag
Verification
verify_element_visible · verify_text_visible · verify_value · verify_list_visible
Browser Management
wait_for · execute_javascript · dialog_handle · console_logs · network_monitor · resize_window · pdf_generate
Tabs
tab_list · tab_select · tab_new · tab_close
Session
close_browser · reset_session · set_stealth_mode
Recording
start_recording · stop_recording · recording_status · clear_recording
Batch
batch_execute
AI Agent Tools
| Agent | Tools |
|---|---|
| Planner | planner_setup_page, planner_explore_page, planner_save_plan |
| Generator | generator_setup_page, generator_read_log, generator_write_test, generator_write_seed, generator_save_spec, generator_read_spec |
| Healer | healer_run_tests, healer_debug_test, healer_fix_test, healer_inspect_page, browser_generate_locator |
| Analyzer | analyzer_setup, analyzer_import_context, analyzer_scan_product, analyzer_build_risk_profile, analyzer_save_profile, analyzer_generate_documentation |
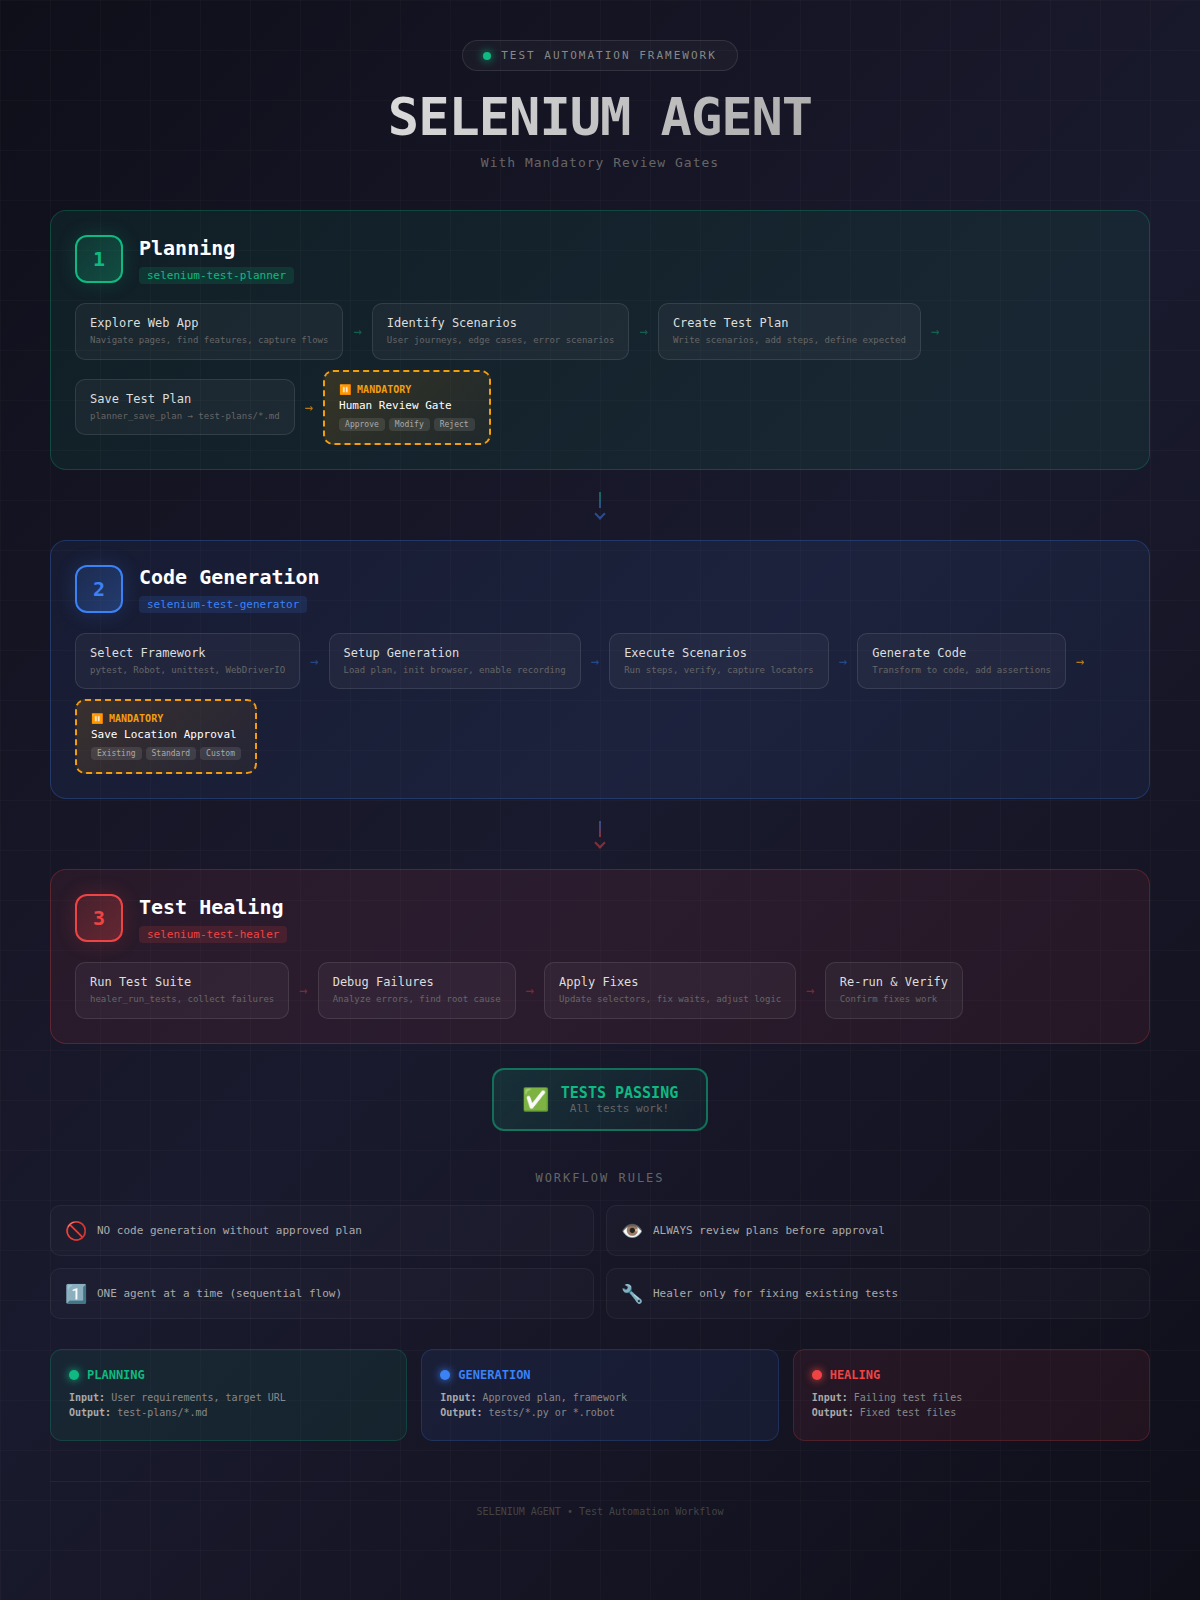
AI Test Agents
A complete testing pipeline with human review gates:
┌─────────────────┐    ┌─────────────┐    ┌─────────────┐    ┌────────────┐
│    Analyzer     │───▶│   Planner   │───▶│  Generator  │───▶│   Healer   │
│  (risk profile) │    │ (test plan) │    │ (test code) │    │(fix tests) │
└─────────────────┘    └─────────────┘    └─────────────┘    └────────────┘
                             │                  │
                        human review       human review
See Example Chats above for full copy-paste prompts covering each stage.
Configuration
Environment Variables
| Variable | Default | Description |
|---|---|---|
SELENIUM_GRID_URL | — | Grid hub URL (enables parallel features) |
SELENIUM_BROWSER | chrome | Browser to use (chrome, firefox, edge) |
SELENIUM_HEADLESS | false | Run browser in headless mode |
SELENIUM_TIMEOUT | 30000 | Default timeout in ms |
SE_AVOID_STATS | — | Set to true to disable Selenium usage statistics |
Local Browser (No Grid)
Works without Grid — just don't set SELENIUM_GRID_URL:
{
  "mcpServers": {
    "selenium-mcp": {
      "command": "npx",
      "args": ["selenium-ai-agent"]
    }
  }
}
Docker Compose
The included docker-compose.yml gives you a production-ready Grid:
services:
  selenium-hub:
    image: selenium/hub:4.40.0
    ports:
      - "4444:4444"

  chrome-node:
    image: selenium/node-chrome:4.40.0
    deploy:
      replicas: 4  # 4 Chrome browsers

  firefox-node:
    image: selenium/node-firefox:4.40.0
    deploy:
      replicas: 1  # 1 Firefox browser
Project Structure
selenium_agent/
├── selenium-mcp-server/     # TypeScript MCP server (npm: selenium-ai-agent)
│   └── src/
│       ├── server.ts        # MCP protocol handler
│       ├── context.ts       # Browser session management
│       ├── grid/            # Selenium Grid integration
│       │   ├── grid-client.ts
│       │   ├── session-pool.ts
│       │   └── exploration-coordinator.ts
│       └── tools/           # 73 tools
│           ├── navigation/
│           ├── elements/
│           ├── grid/        # Parallel execution tools
│           ├── agents/      # AI agent tools
│           └── analyzer/    # Risk analysis
│
├── selenium-grid/
│   └── docker-compose.yml   # Selenium Grid setup
├── agents/                  # Agent prompt definitions
└── docs/                    # Guides and diagrams
Documentation
- MCP Client Setup — Claude Code, Claude Desktop, Cursor, Copilot, Cline, Windsurf
- Agent Workflow — End-to-end testing pipeline
- Framework Standards — Code generation conventions
- Deployment Guide — Production deployment
Contributing
Contributions welcome! Please read our contributing guidelines and submit PRs.
- Fork the repository
- Create your feature branch (
git checkout -b feature/amazing-feature) - Commit your changes (
git commit -m 'Add amazing feature') - Push to the branch (
git push origin feature/amazing-feature) - Open a Pull Request
License
MIT — see LICENSE for details.
Acknowledgments
- Selenium — The browser automation framework
- Model Context Protocol — The AI agent communication standard
- Anthropic — For Claude and the MCP specification
If this project helps you, please give it a star!
Star on GitHub